Hello everyone:
I have some new rulers to tell you about. They are more than wonderful! These rulers are becoming more popular every day. I keep trying new ones and I haven't found one I didn't like yet. Here are some pictures of the ones I've tried so far but I know I'll soon have then all. If you think you'd like one, you can purchase by just e-mailing me and I'll give you the details and send it out to you.
Here's the first one I tried - the half square triangle. I was so pleased with the outcome of these blocks. This ruler is available in 1.5", 2.5", 3.5", 4.5", 5.5", 6.5" 8.5", 9.5" and 12.5" square sizes. They are also offered in sets, which are more economical.
This first picture shows the ruler which is used to square up the oversized block.
The next picture shows how the ruler is placed on the block and the groove locks on to the seam, ready for trimming. Then you see the perfect half square triangle block all trimmed up - easy peasy!
I was so pleased with the way these blocks turned out using the half square triangle - and fast too!
When I was so pleased with the half square triangles, just had to try the flying geese. I've always hated making the geese when you use different colours on each side. Using these rulers makes this process a breeze. Here are some pictures.
The first shows the ruler I used to square up the flying geese and the second picture is my block finished. I'd now like to make a quilt with more flying geese blocks. They certainly don't intimidate me any more.
Didn't they turn out great! There are so many sizes, even the tiny sizes that are used in the Jo Morton patterns.
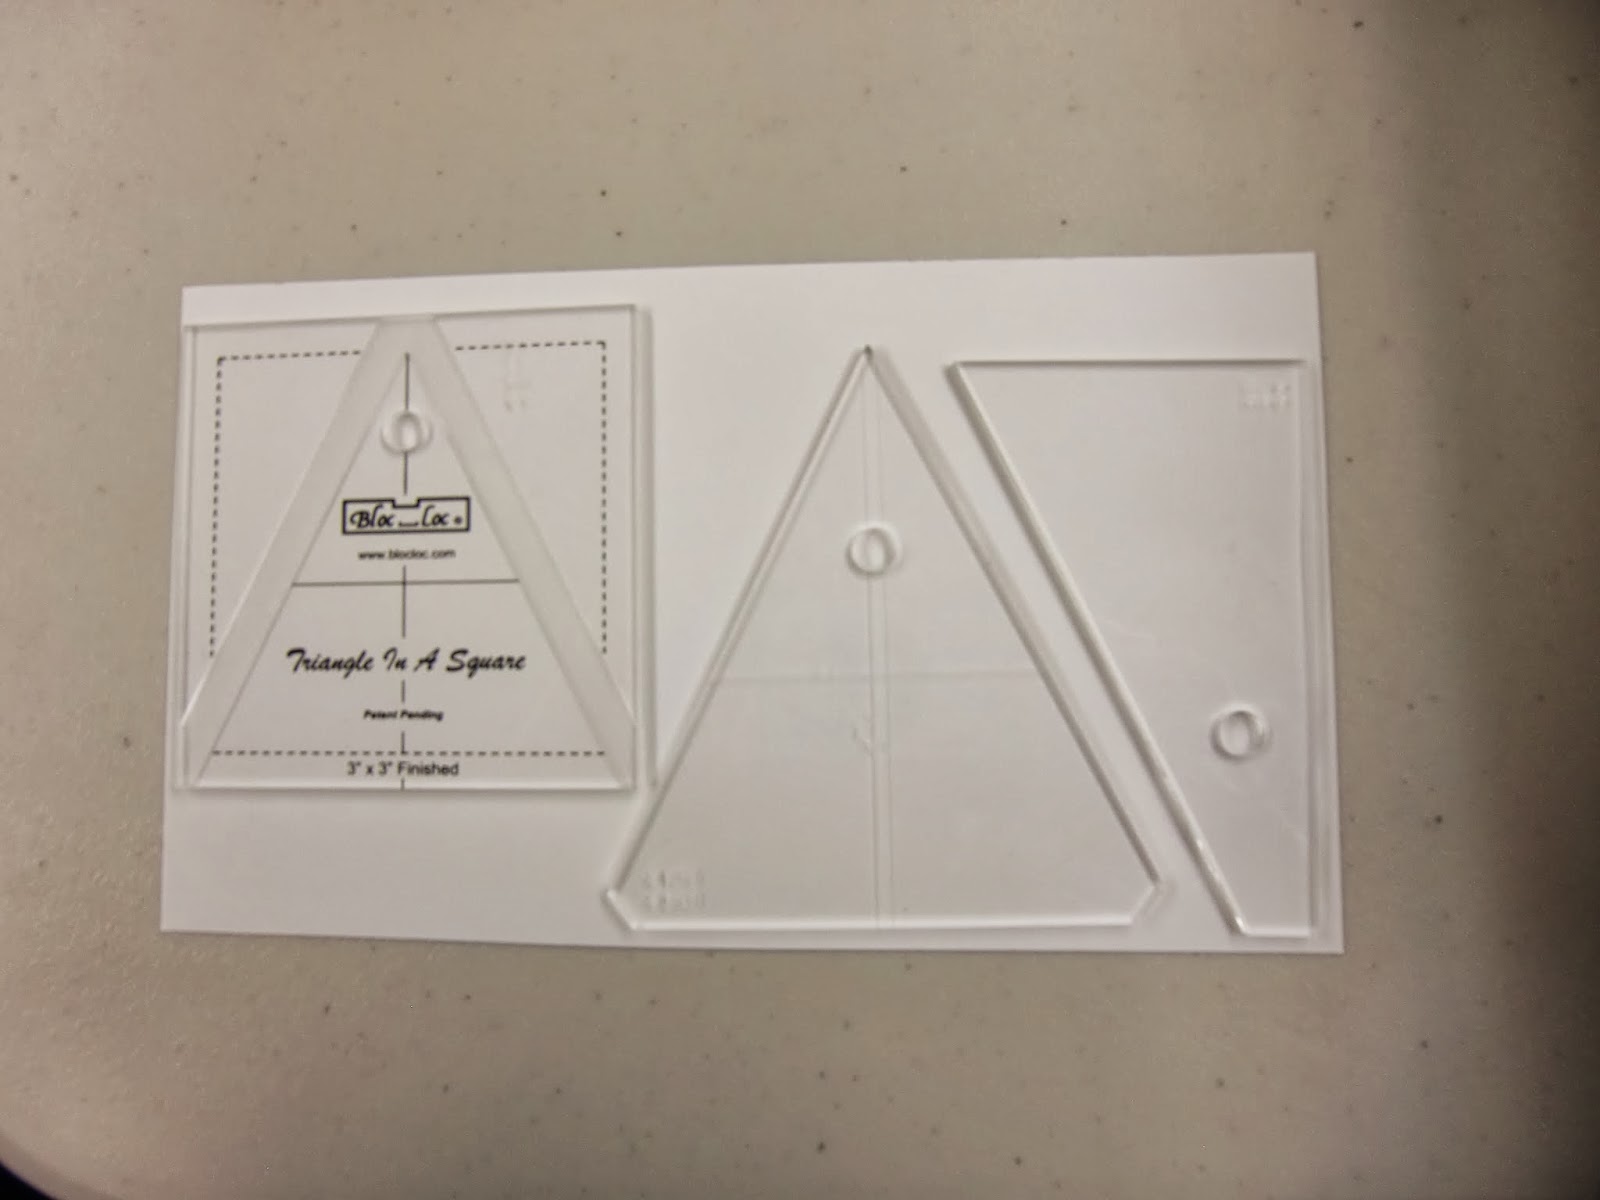
Well, I couldn't stop with those two rulers, had to order the Triangle In A Square System. I have a pattern I'd like to make that this ruler will be perfect for. In the first picture you'll see there are 3 pieces. You get the two over sized templates to cut your fabric, along with the double grooved trimming ruler to lock onto both seams. Think of all the blocks and sashings you can make with this ruler.
This second picture shows the block before trimming with the ruler ready to go, along with the completed block - perfect.
I think I'll try the Half Rectangle Triangle Square Up Ruler next - looks very interesting.
If you want to see a very good tutorial on this ruler, go to happyquiltingmelissa.blogspot.com. She is a more experienced blogger than I am and her pictures are wonderful.
Remember, if you want any of these rulers, just e-mail me.
Happy quilting, and may your bobbin always be full.
Cheers!
Thought tonight would be a good time to show you how I made my little pillows. They end up 12" x 16".
The patterns come from The Quilt Company in Pennsylvania and are available at many quilt shops. They make some very nice patterns and I especially like these.
I didn't follow the pattern completely and the reason is that I wanted to save the step of quilting it.
First of all I cut a piece of cotton that will be used for background just a smidge larger than the pattern calls for because sometimes the quilting will make your project a little smaller. Using my frixion pen, I traced the greenery pattern onto it.
Second, I cut a piece of very thin cotton (something you wondered why you bought it and is not good enough to put into a quilt). I cut it about 14" x 18". On top of that I put a piece of thin batting about the same size. Then I centered the background piece on top.
These 3 pieces can be sprayed with 505 or something of that nature to keep the sandwich together, or, you can baste around the area to be embroidered.
I used Sulky 12 wt. thread and starting at one end, I stitched to the first branch, then up that branch and back down right on top of my first row of stitching. Then I went along the main branch to the next branch. If there were branches coming off, I would go up the little branch, back to where I veered off, then to the end of the branch and back to the main branch, always sewing right on top of the previous stitching. If I went off, I didn't worry - it's a tree branch and they can go any which way. When I got to the end of the main branch, I turned around and did a second row of stitching along that main branch. If I made an error, I just left a tail of thread I could weave in and started again. When I was all finished, I pulled the thread ends to the back and tied them off.
After the branch was sewn, I drew a line around it, the size the fabric was supposed to be in the first place. Remember, I cut this piece larger in case sewing the branches made this piece smaller.
Borders are cut to a specific size as per the pattern. First the small red border. I used the line I drew to simulate the edge of the background fabric.
Next comes the outer border, which is dark green on this one.
There are a couple of ways to finish the pillow but I just followed the instructions to have one piece fold over the other. It worked just fine for me.
Before turning the pillow right side out, I did a zig-zag stitch all around the raw edges, clipped the corners and turned.
Here is one of the pillows finished. Really cute!
I enjoyed making mine and hope you will too.
Hope everyone has had a nice week-end and may your bobbins always be full!
Cheers
Our family like to have some fun at Christmas. Don't you think this fabric will cause some laughter?
I hope so! Will have to make some pillowcases for the girls. Fun to make too!
The casserole cover is all finished. Wish I'd used the orange/yellow colour for the binding though, think it might have looked better. I didn't use 2-1/2" strips like the pattern called for, just quilted every 2" instead. It looks like a pretty useful item to me. What about you?
Starting a new quilt. This one is called "Under The Stars". It's a really cute snowman pattern by The Rabbit Factory. They have some wonderful patterns and these guys were so cute, I couldn't resist. I need to cut 156 squares in a variety of colours so am starting with red (one of my favorite colours).
Duncan came for the day to quilt with us. My DH will often leave a treat for him (a bone from the butcher shop) and Duncan will look for him to play a bit. Here he is sprawled out on the floor while DH gives him a foot rub, but note, he's not letting go of the bone. He just doesn't understand that we don't want it. It just doesn't go with our tea!
Well, will sign off for now. Come back again and watch the progress on my "Under The Stars" quilt.
Happy Thanksgiving to all my Canadian blog friends and may your bobbins always be full!
We went to the most amazing Quilt Show last week-end. It was held at the Chautauqua Institution in New York state. There were several Guilds showing their quilts and numerous vendors with all their wonderful goodies (just try not to spend money) and it was delightful to roam the grounds in the sunshine. Sorry I don't have any pictures but if you google "Quilting in Chautauqua" you will get an idea of what I'm talking about. Good quilts, good vendors, good accommodation, good food, good friends. I couldn't ask for anything better. What a week-end!!!